(Some links and .pdf documents are set to open in a new tab. If the link or document won't open check your browser settings or right-click and "Open in new tab" or "Open in new window")
Basic instructions for non-spray application (see instructions above or our YouTube Channel for other procedures):
|
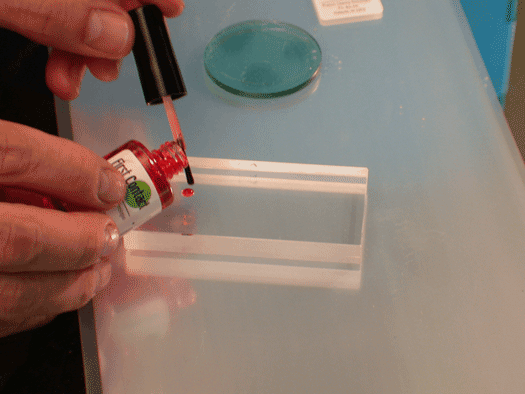
Apply First Contact™ directly to the surface. If horizontal, simply pour the polymer from the 15ml or 30ml bottle, or you can use a pipette for more precise application to small surfaces. If your surface is inclined or vertical you can pour polymer into a shallow container, dip a brush into the polymer to "load" the bristles, and carefully apply to the surface. Liberally coat the surface without allowing First Contact™ to run under retaining rings or mountings. You can use orings to control flow and avoid getting polymer under retaining rings and mounts. For inclined or vertical surfaces it may be useful to apply multiple thin coats, allowing each to partially dry so as to avoid excessive sagging or flowing.
|
|
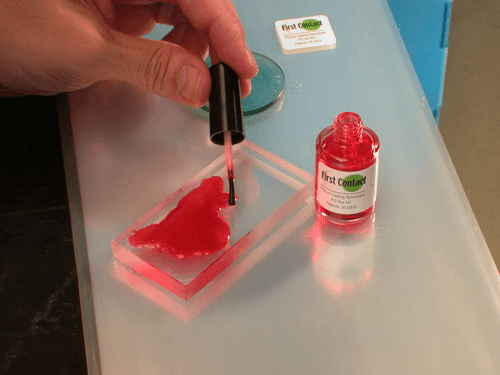
Spread First Contact™ Polymer using the applicator brush or for larger surfaces select a fan brush from our Brushes page. If not using our brushes, test your brush as the bristles may not be compatible with the solvents in First Contact™. Use the polymer's surface tension to gently spread the polymer to make a thick, even coat. DO NOT use a scrubbing action like you're painting a house or fence! DO take care to avoid spilling or flowing over the edge of the optic. Take care to keep it out of any mounting frames when cleaning an assembled or mounted part. Toothpicks can be used to gently remove dried polymer from corners etc. if necessary.
|
|
|
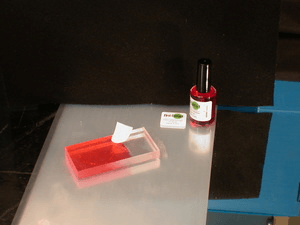
Allow the polymer to dry completely (~30 minutes for flat optics, overnight for frosted surfaces where the polymer is thick, diffraction gratings, and silver mirrors and gold mirrors while learning to use First Contact™). Drying time depends on film thickness, airflow across the surface, temperature, and humidity. The solvents must be able to evaporate for the film to dry. Film adhesion remains high until the film is completely dry; in fact, the film adhesion continues to decline until all solvents are gone from the polymer film, this is why long dry times are suggested for the most sensitive optics. When in doubt, allow more time to dry. After you have some experience and success, then shorten dry times according to your experience and needs.
|
|
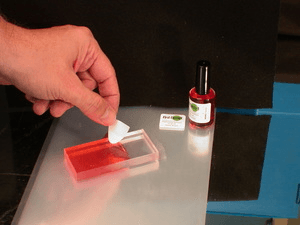
Remove cured First Contact™ Polymer by one of the three typical methods described in our Polymer Lifting Document. Lint-free peel tabs are provided with all kits. For bulk bottles you must order your choice of lifting material such as our Peel Tabs, Chemically Inert Mesh, PEEK Mesh, or Unwaxed Dental Floss. Remember, peel tabs are applied once the polymer is DRY! Gently press the peel tab on the dry polymer at an edge and allow the tab's adhesive to fully adhere to the polymer. Peel the tab back across the dry polymer at nearly a 180 degree angle. Once the polymer starts to lift the entire film will come off easily. If the tab peels from the polymer it is likely the polymer has flowed over the edge. Roll the tab over the edge slightly and try to peel again. It may also be necessary to "snap" the tab quickly to overcome edge tension and get the peel started as described in this video. Once the peel has started the entire film will easily come off.
Both types of mesh and the floss are embedded into the polymer when partially dry, or once the polymer is completely dry you can apply a bit more liquid polymer, place the mesh or floss into the liquid polymer, then apply more polymer over top then allow to dry before peeling. In this manner the mesh or floss is embedded into the dry polymer and you simply grasp the mesh or floss and lift, and again once an edge starts to lift, the entire film will come off easily.
Take care not to touch the optical surface with the sticky tabs (First Contact™ can be used to remove peel tab adhesive). If necessary, remove residual polymer on retaining rings/mountings with a wood or soft plastic toothpick that will not scratch your optic. If the polymer film tore during removal, it was too thin. Reapply First Contact over the old film using a thicker application and once dry, peel as described above.
|
|
|
|
|
*NOTE: Certain coatings have inherently poor adhesion, especially if manufactured without effective substrate preparation. Always test a non-critical section first, especially with gold and silver coatings. That being said, we and our customers have successfully protected and cleaned lots of gold and silver mirrors and gratings including those on the WM Keck Telescope and the Gemini North Silver. While we routinely clean diffraction grating, the old adage about gratings still holds - don’t touch them unless you have to!
|
|
|


